API使って楽したい
grafanaでGUI画面からぽちぽちデータソース追加したりダッシュボード作ったりするのも良いですが、ちょっと楽したいなと思ったときAPI使って自動化し作業負荷減らしたいですよね。
公式ドキュメントには、APIの使い方の詳細があまり書かれておらず多少戸惑いましたが、実際に触ってみて使い方が分かったのでまとめました。
APIトークンを取得する
ダッシュボード上から取得する場合
まずはAPIを使うためのトークンを取得していきます。
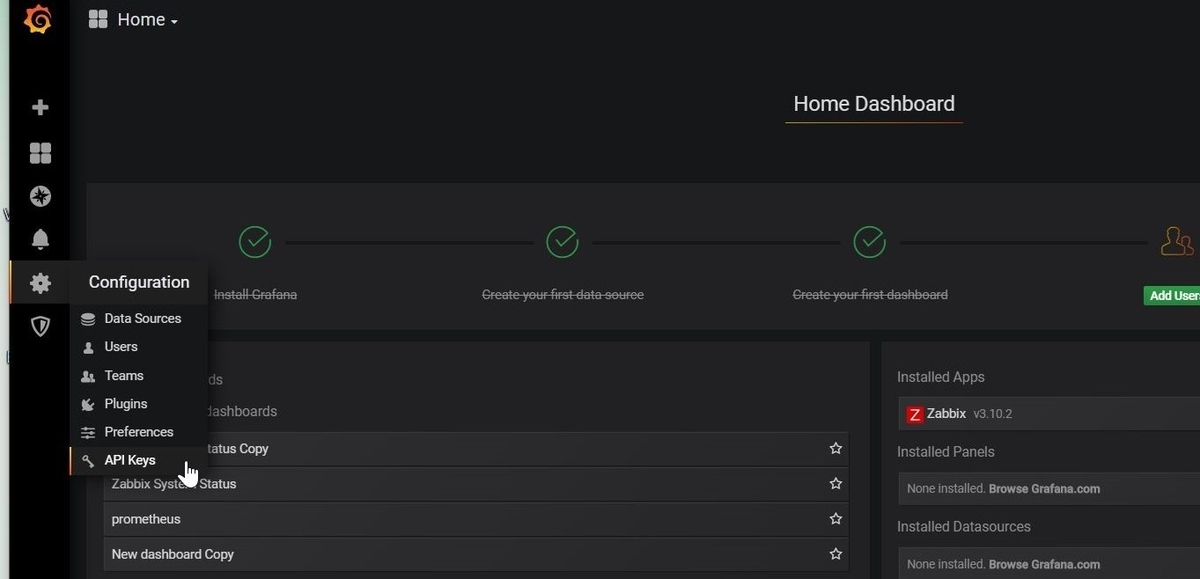
grafanaのAPIトークンはGUI画面から取得できるので、grafanaにログインし画面左の[configuration]から[API key]を選択します。

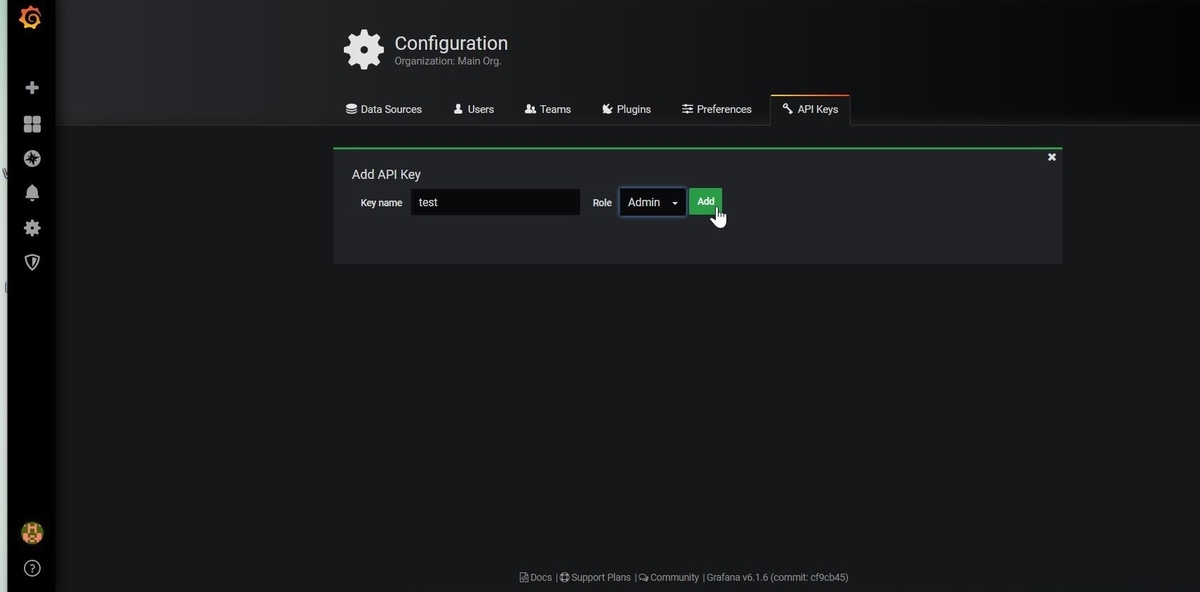
[Add API Key]をクリックしユーザー名とロールを入力します。

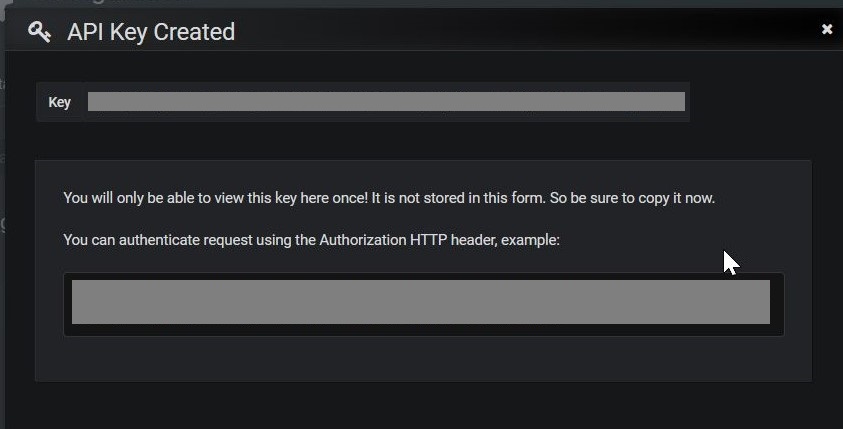
[Add]をクリック後キーが発行されるのでコピーしておきます。

キー発行のポップアップにコマンド例があるので実際にレスポンスが返ってくるか試してみましょう。
#ホームのダッシュボード情報がJSONで返ってきます
$ curl -H "Authorization: Bearer {API_TOKEN}" http://[grafana_ip_address]:3000/api/dashboards/home

{"meta":{"isHome":true,"canSave":false,"canEdit":true,"canAdmin":false,"canStar":false,"slug":"","url":"","expires":"0001-01-01T00:00:00Z","created":"0001-01-01T00:00:00Z","updated":"0001-01-01T00:00:00Z","updatedBy":"","createdBy":"","version":0,"hasAcl":false,"isFolder":false,"folderId":0,"folderTitle":"General","folderUrl":"","provisioned":false},"dashboard":{"annotations":{"list":[]},"editable":true,"folderId":null,"gnetId":null,"graphTooltip":0,"hideControls":true,"id":null,"links":[],"panels":[{"content":"\u003cdiv class=\"text-center dashboard-header\"\u003e\n  \u003cspan\u003eHome Dashboard\u003c/span\u003e\n\u003c/div\u003e","editable":true,"gridPos":{"h":3,"w":24,"x":0,"y":0},"id":1,"links":[],"mode":"html","style":{},"title":"","transparent":true,"type":"text"},{"folderId":0,"gridPos":{"h":17,"w":12,"x":0,"y":6},"headings":true,"id":3,"limit":30,"links":[],"query":"","recent":true,"search":false,"starred":true,"tags":[],"title":"","transparent":false,"type":"dashlist"},{"editable":true,"error":false,"gridPos":{"h":17,"w":12,"x":12,"y":6},"id":4,"links":[],"title":"","transparent":false,"type":"pluginlist"},{"gridPos":{"h":4,"w":24,"x":0,"y":3},"id":123123,"type":"gettingstarted"}],"rows":[],"schemaVersion":17,"style":"dark","tags":[],"templating":{"list":[]},"time":{"from":"now-6h","to":"now"},"timepicker":{"hidden":true,"refresh_intervals":["5s","10s","30s","1m","5m","15m","30m","1h","2h","1d"],"time_options":["5m","15m","1h","6h","12h","24h","2d","7d","30d"],"type":"timepicker"},"timezone":"browser","title":"Home","version":0}}
curlコマンドから取得する場合
上記では、GUI画面からAPIトークン取得する方法を説明しましたが、もちろんCLIでも取得できます。やっていることは上記と一緒です。-dオプションの後に"name"でキー名、"role"で管理者権限なのか、閲覧者のみなのか等指定し、URL指定するときにGrafanaにログインするときのユーザー・パスワードを指定します。
# CLIでAPIトークンを取得する
$ curl -X POST -H "Content-Type: application/json" -d '{"name":"apikeytest", "role": "Admin"}' http://[user_name]:[password]@[grafana_server_IP]:3000/api/auth/keys | jq
{
  "name": "apikeytest",
  "key": "eyJrIjoiQTRubUlONGU1N1lJbG92NzlEV0VXcEdqxxxxxxxxxxxxxxxxxxxxxxxxxxxxxxxxxxxxxxxx=="
}

#取得したトークンをそのまま変数にいれるときはjqコマンドでキーだけ表示させるようにすると良い
$ API_KEY=`curl -X POST -H "Content-Type: application/json" -d '{"name":"apikeytest", "role": "Admin"}' http://[user_name]:[password]@[grafana_server_IP]:3000/api/auth/keys | jq -r .key`
$ echo $API_KEY
eyJrIjoiQTRubUlONGU1N1lJbG92NzlEV0VXcEdqxxxxxxxxxxxxxxxxxxxxxxxxxxxxxxxxxxxxxxxx==
APIを使ってみよう
curlコマンドでレスポンスが確認できたら、実際にAPIを使って色々試してみます。
JSONを見やすくするため、jqコマンドは事前にインストールしておきましょう。
APIでどういうことができるかはドキュメントに書かれています。今回は、データソースAPIを使います。
grafana.com
データソース一覧を取得
登録しているデータソース一覧を出力します。
#トークン長いので変数に入れる
$API_TOKEN="Authorization: Bearer [API_TOKEN]"
$ curl -X GET -H "${API_TOKEN}" http://[grafana_ip_address]:3000/api/datasources |  jq

[
  {
    "id": 2,
    "orgId": 1,
    "name": "Prometheus",
    "type": "prometheus",
    "typeLogoUrl": "public/app/plugins/datasource/prometheus/img/prometheus_logo.svg",
    "access": "proxy",
    "url": "http://localhost:9090",
    "password": "",
    "user": "",
    "database": "",
    "basicAuth": false,
    "isDefault": false,
    "jsonData": {
      "httpMethod": "GET",
      "keepCookies": []
    },
    "readOnly": false
  },
  {
    "id": 1,
    "orgId": 1,
    "name": "Zabbix",
    "type": "alexanderzobnin-zabbix-datasource",
    "typeLogoUrl": "public/plugins/alexanderzobnin-zabbix-datasource/img/zabbix_app_logo.svg",
    "access": "proxy",
    "url": "http://localhost/zabbix/api_jsonrpc.php",
    "password": "",
    "user": "",
    "database": "",
    "basicAuth": false,
    "isDefault": true,
    "jsonData": {
      "addThresholds": false,
      "alerting": false,
      "alertingMinSeverity": 3,
      "dbConnectionDatasourceId": null,
      "dbConnectionEnable": false,
      "disableReadOnlyUsersAck": false,
      "keepCookies": [],
      "password": "zabbix",
      "trends": false,
      "username": "Admin",
      "zabbixVersion": 4
    },
    "readOnly": false
  }
]
データソース名を指定して詳細表示
データソース名を指定することで対象のデータソースの詳細を出力できます。
$ curl -X GET -H "${API_TOKEN}" http://[grafana_ip_address]:3000/api/datasources/name/Prometheus | jq
{
  "id": 2,
  "orgId": 1,
  "name": "Prometheus",
  "type": "prometheus",
  "typeLogoUrl": "",
  "access": "proxy",
  "url": "http://localhost:9090",
  "password": "",
  "user": "",
  "database": "",
  "basicAuth": false,
  "basicAuthUser": "",
  "basicAuthPassword": "",
  "withCredentials": false,
  "isDefault": false,
  "jsonData": {
    "httpMethod": "GET",
    "keepCookies": []
  },
  "secureJsonFields": {},
  "version": 2,
  "readOnly": true
}
データソースを削除
登録されているデータソースを削除します。
$ curl -X DELETE -H "${API_TOKEN}" http://[grafana_ip_address]:3000/api/datasources/name/Prometheus-1 | jq

{
  "message": "Data source deleted"
}
データソースを追加
最後にデータソースの登録です。
$ curl -X POST -H "${API_TOKEN}" -H "Content-Type: application/json" -d '{
"name":"prometheus-test",
"type":"prometheus",
"url":"http:localhost:9090",
"access":"proxy",
"basicAuth":false
}' http://[grafana_ip_address]:3000/api/datasources

"datasource":{"id":4,"orgId":1,"name":"prometheus-test","type":"prometheus","typeLogoUrl":"","access":"proxy","url":"http:localhost:9090","password":"","user":"","database":"","basicAuth":false,"basicAuthUser":"","basicAuthPassword":"","withCredentials":false,"isDefault":false,"jsonData":{},"secureJsonFields":{},"version":1,"readOnly":false},"id":4,"message":"Datasource added","name":"prometheus-test"}
ちなみにデータソースを追加する場合は、上記のように「-H "Content-Type: application/json"」を入れないと以下のエラーが出力されるので注意です。
[{"fieldNames":["Name"],"classification":"RequiredError","message":"Required"},{"fieldNames":["Type"],"classification":"RequiredError","message":"Required"},{"fieldNames":["Access"],"classification":"RequiredError","message":"Required"}]GrafanaのAPI関連の記事は以下のQiitaがおすすめです。
qiita.com
今回はデータソースAPIを使いましたが、それ以外にもダッシュボードを作成したりスナップショットを取得したりすることができます。
公式ドキュメントは少しわかりにくいですが、実際使ってみると結構簡単にできたのでぜひ使ってみると良いと思います。
おしまい。