この前Prometheusを初めて使ってみたので、復習を兼ねてPrometheusで取得したメトリクスをGrafanaで可視化してみたいと思います。
Prometheus?
- オープンソースの監視ツールです。
- プル型なのでPrometehusサーバーが監視先サーバーに聞きまわり、監視メトリクスをかき集めているイメージです。
- 可視化ツールのGrafanaと親和性が高いです。
- Prometehusのデフォルトのダッシュボードがありますが、可視化には強くないので取得したメトリクスを分かりやすく可視化したい場合はGrafanaを使います。
- セットアップが非常に簡単で、バイナリをインストールして起動させるだけで監視開始させることができます。
環境
- CentOS7.6
- Prometheus server v2.32
- Prometheus node v0.16
Exporterのインストール
導入は本当に簡単です。さっと終わります。
#インストール先のディレクトリを作成する
$ mkdir /etc/prometheus
$ cd /etc/prometehus
#バイナリファイルをインストールする
$ wget https://github.com/prometheus/node_exporter/releases/download/v0.16.0/node_exporter-0.16.0.linux-amd64.tar.gz
#インストールしたバイナリを解凍する
tar xvzf node_exporter-0.16.0.linux-amd64.tar.gz
#ディレクトリ名を変更する
$ mv node_exporter-0.16.0.linux-amd64.tar.gz node_exporter
#exporterが動くかテストする
$ cd node_exporter
$ ./node_exporter
以下のようにデータ取得できていればOKです。
$ ./node_exporter
INFO[0000] Starting node_exporter (version=0.16.0, branch=HEAD, revision=d42bd70f4363dced6b77d8fc311ea57b63387e4f)  source="node_exporter.go:82"
INFO[0000] Build context (go=go1.9.6, user=root@a67a9bc13a69, date=20180515-15:52:42)  source="node_exporter.go:83"
INFO[0000] Enabled collectors:                           source="node_exporter.go:90"
INFO[0000]  - arp                                        source="node_exporter.go:97"
INFO[0000]  - bcache                                     source="node_exporter.go:97"
INFO[0000]  - bonding                                    source="node_exporter.go:97"
INFO[0000]  - conntrack                                  source="node_exporter.go:97"
INFO[0000]  - cpu                                        source="node_exporter.go:97"
INFO[0000]  - diskstats                                  source="node_exporter.go:97"
INFO[0000]  - edac                                       source="node_exporter.go:97"
INFO[0000]  - entropy                                    source="node_exporter.go:97"
INFO[0000]  - filefd                                     source="node_exporter.go:97"
INFO[0000]  - filesystem                                 source="node_exporter.g
動作確認できたら、exporterをサービス化します。
#サービスファイルの作成
$ vi /etc/systemd/system/node_exporter.service
[Unit]
Description=Node Exporter
Documentation=https://github.com/prometheus/node_exporter

[Service]
Type=simple
ExecStart=/etc/prometheus/node_exporter/node_exporter
Restart=always

[Install]
WantedBy=multi-user.target
サービスを有効にするためにデーモンをリロードし、サービスを起動する
$systemctl daemon-reload
$systemctl enable node_exporter
$systemctl start node_exporter
$systemctl status node_exporter
● prometheus_node.service - Node Exporter
   Loaded: loaded (/etc/systemd/system/prometheus_node.service; enabled; vendor preset: disabled)
   Active: active (running) since Sun 2019-07-07 06:43:19 UTC; 34min ago
     Docs: https://github.com/prometheus/node_exporter
 Main PID: 8700 (node_exporter)
   CGroup: /system.slice/prometheus_node.service
           mq8700 /etc/prometheus/node_exporter/node_exporter

Jul 07 06:43:19 localhost.localdomain node_exporter[8700]: time="2019-07-07T0...
Jul 07 06:43:19 localhost.localdomain node_exporter[8700]: time="2019-07-07T0...
Jul 07 06:43:19 localhost.localdomain node_exporter[8700]: time="2019-07-07T0...
ステータスがアクティブになっていればOKです。
Prometheus_serverのインストール
続いて、Prometheus_serverの準備をしていきます。
#prometheus serverのインストール
$ wget https://github.com/prometheus/prometheus/releases/download/v2.3.2/prometheus-2.3.2.linux-amd64.tar.gz
#バイナリファイルを解凍する
$ tar xvzf prometheus-2.3.2.linux-amd64.tar.gz
#ディレクトリ名を変更する
$ mv prometheus-2.3.2.linux-amd64 prometheus_server
$ cd prometheus_server
#設定ファイルの修正
$ vi prometheus.yml
# my global config
global:
  scrape_interval:     15s # Set the scrape interval to every 15 seconds. Default is every 1 minute.
  evaluation_interval: 15s # Evaluate rules every 15 seconds. The default is every 1 minute.
  # scrape_timeout is set to the global default (10s).

# Alertmanager configuration
alerting:
  alertmanagers:
  - static_configs:
    - targets:
      # - alertmanager:9093

# Load rules once and periodically evaluate them according to the global 'evaluation_interval'.
rule_files:
  # - "first_rules.yml"
  # - "second_rules.yml"

# A scrape configuration containing exactly one endpoint to scrape:
# Here it's Prometheus itself.
scrape_configs:
  # The job name is added as a label `job=<job_name>` to any timeseries scraped from this config.
  - job_name: 'node_exporter' #変更箇所

    # metrics_path defaults to '/metrics'
    # scheme defaults to 'http'.

    static_configs:
- targets: ['localhost:9100'] #変更箇所今回は同じホストでexporterを起動させているので、ターゲット先は"localhost:9100"となります。exporterによって指定するポートが違うので注意が必要です。
prometheusを起動させ、正常に監視開始するか確認します。"Server is ready to receive web requests."とうメッセージが表示されていればOKです。
$ ./prometheus
level=info ts=2019-07-07T08:12:19.556134535Z caller=main.go:222 msg="Starting Prometheus" version="(version=2.3.2, branch=HEAD, revision=71af5e29e815795e9dd14742ee7725682fa14b7b)"
level=info ts=2019-07-07T08:12:19.556251007Z caller=main.go:223 build_context="(go=go1.10.3, user=root@5258e0bd9cc1, date=20180712-14:02:52)"
level=info ts=2019-07-07T08:12:19.556276083Z caller=main.go:224 host_details="(Linux 3.10.0-957.10.1.el7.x86_64 #1 SMP Mon Mar 18 15:06:45 UTC 2019 x86_64 localhost.localdomain (none))"
level=info ts=2019-07-07T08:12:19.556296925Z caller=main.go:225 fd_limits="(soft=1024, hard=4096)"
level=info ts=2019-07-07T08:12:19.556926921Z caller=main.go:533 msg="Starting TSDB ..."
level=info ts=2019-07-07T08:12:19.559585106Z caller=web.go:415 component=web msg="Start listening for connections" address=0.0.0.0:9090
level=info ts=2019-07-07T08:12:19.570862184Z caller=main.go:543 msg="TSDB started"
level=info ts=2019-07-07T08:12:19.570898772Z caller=main.go:603 msg="Loading configuration file" filename=prometheus.yml
level=info ts=2019-07-07T08:12:19.573468239Z caller=main.go:629 msg="Completed loading of configuration file" filename=prometheus.yml
level=info ts=2019-07-07T08:12:19.573559206Z caller=main.go:502 msg="Server is ready to receive web requests."
起動確認ができたら、サービス化ファイルを作成します。
$ vi /etc/systemd/system/prometheus_server.serivice
[Unit]
Description=Prometheus
Documentation=https://prometheus.io/docs/introduction/overview/
After=network-online.target
After=network-online.target

[Service]
Type=simple
ExecStart=/etc/prometheus/prometheus_server/prometheus \
  --config.file=/etc/prometheus/prometheus_server/prometheus.yml \

[Install]
WantedBy=multi-user.target

#デーモンをリロードする
$systemctl daemon-reload
#サービスを有効にする
$systemctl enable prometheus_server
#サービスを起動する
$systemctl start prometheus_server
$systemctl status prometheus_server
● prometheus_server.service - Prometheus
   Loaded: loaded (/etc/systemd/system/prometheus_server.service; enabled; vendor preset: disabled)
   Active: active (running) since Sun 2019-07-07 08:24:42 UTC; 6s ago
     Docs: https://prometheus.io/docs/introduction/overview/
 Main PID: 16275 (prometheus)
   CGroup: /system.slice/prometheus_server.service
           mq16275 /etc/prometheus/prometheus_server/prometheus --config.file...

Jul 07 08:24:42 localhost.localdomain prometheus[16275]: level=info ts=2019-0...
Jul 07 08:24:42 localhost.localdomain prometheus[16275]: level=info ts=2019-0...
Jul 07 08:24:42 localhost.localdomain prometheus[16275]: level=info ts=2019-0...
Jul 07 08:24:42 localhost.localdomain prometheus[16275]: level=info ts=2019-0...
Jul 07 08:24:42 localhost.localdomain prometheus[16275]: level=info ts=2019-0...
Jul 07 08:24:42 localhost.localdomain prometheus[16275]: level=info ts=2019-0...
Jul 07 08:24:42 localhost.localdomain prometheus[16275]: level=info ts=2019-0...
Jul 07 08:24:42 localhost.localdomain prometheus[16275]: level=info ts=2019-0...
Jul 07 08:24:42 localhost.localdomain prometheus[16275]: level=info ts=2019-0...
Jul 07 08:24:42 localhost.localdomain prometheus[16275]: level=info ts=2019-0...
サービスがアクティブであることを確認できたらOKです。
prometheusのGUI画面を確認する
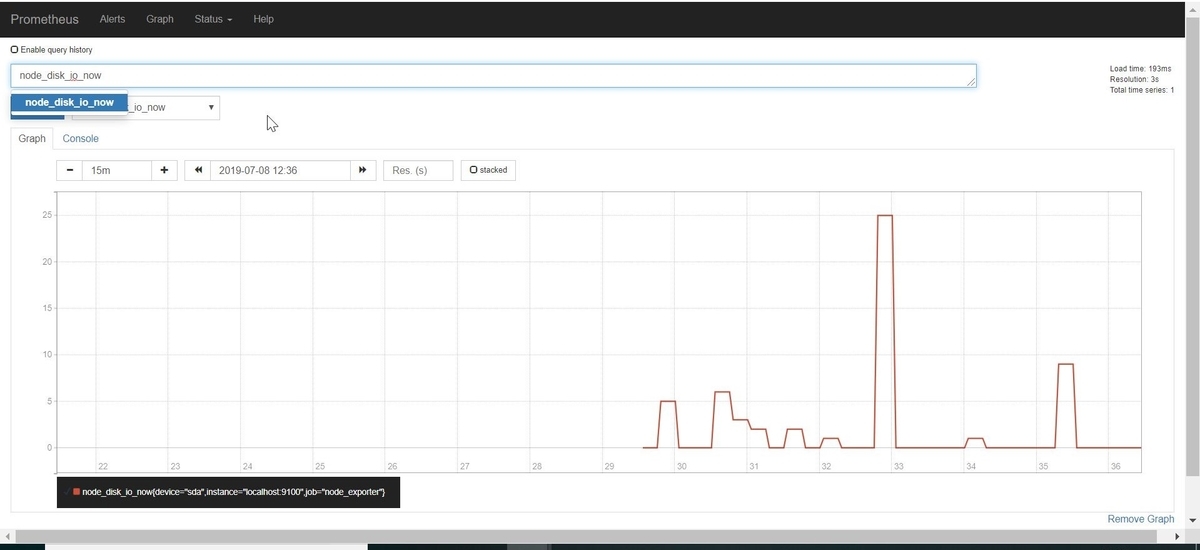
"http://[prometheus_server_IPaddress]:9100/graph"にアクセスすると、下記のような画面が表示されます。[Execuse]ボタン横のドロップダウンからグラフ化したいメトリクスを選択し、[Execuse]ボタンをクリックするとメトリクスの時系列グラフが表示されます。今回は、nodeのディスクIOの現在値を表示してみました。

Grafanaにデータソース登録する
prometheusのGUI画面にてメトリクスを取得できていることを確認できたら、Grafanaにデータソース登録していきます。
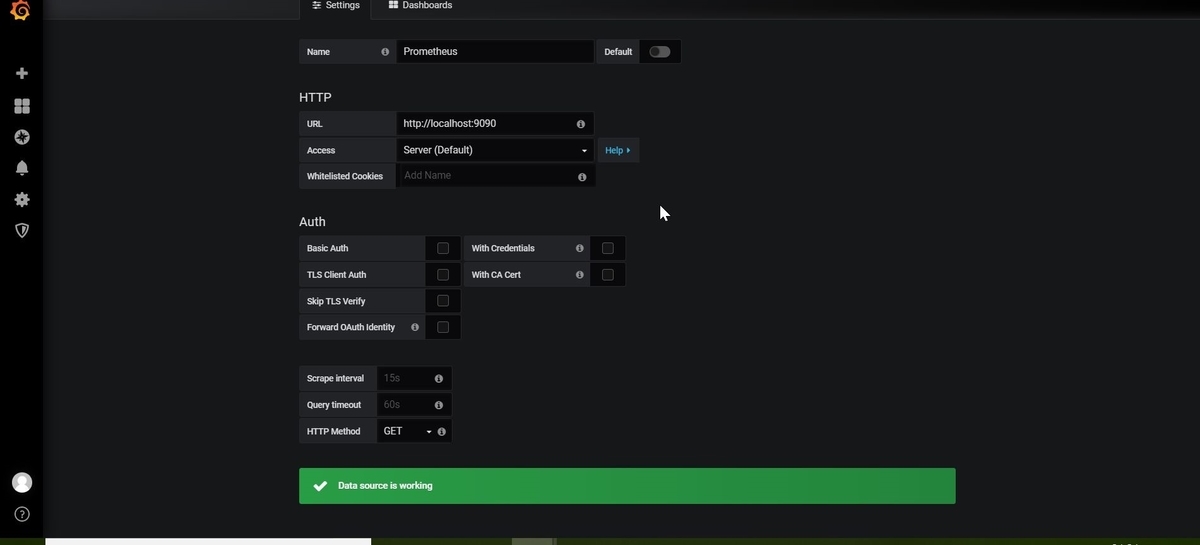
Grafanaにログイン後、prometheusをデータソースに登録していきます。URLは9090ポートを指定し「Save&Test」をクリックし問題なければ登録完了となります。

既存のテンプレートを使ってダッシュボートをインポートする
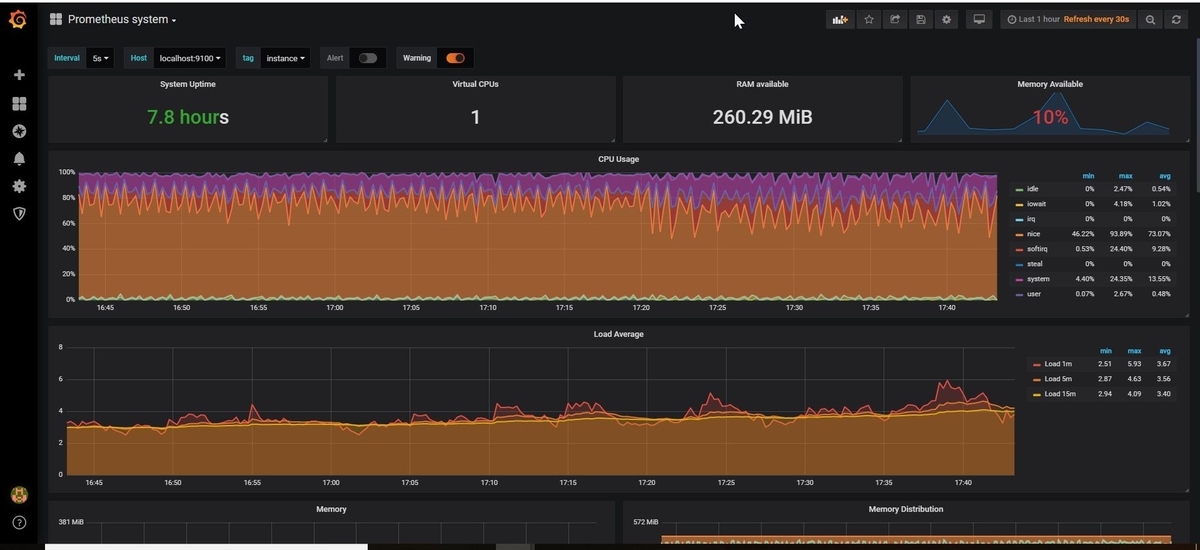
Grafanaは個人でダッシュボード開発している方がいるので、公式ドキュメント見るとテンプレートが豊富にあります。せっかくなので使えるものは使っていきます。今回は以下のPrometheusサーバーの状態を示すダッシュボートを使用しました。
grafana.com
上記のURLにアクセスしてダッシュボードIDをコピーした後、GrafanaGUI画面の右上「▼」から「Import Dashboard」をクリックしダッシュボードIDを入力します。

後はちょこちょこっと微調整すれば簡単にダッシュボード作成できました!わーい!

今回はこんな感じで。
おしまい


