1. linuxbrewのインストール
brewコマンドがないとaws-vaultをインストールできないので、事前に入れておきます。手順は公式HPに沿って進めるとインストール完了します。
docs.brew.sh
# linuxbrewコマンドのインストールに必要なものを入れる
sudo yum groupinstall 'Development Tools'
sudo yum install curl file git
# linuxbrewコマンドインストール
sh -c "$(curl -fsSL https://raw.githubusercontent.com/Linuxbrew/install/master/install.sh)"
# brewコマンドを使えるようにパスを通す
test -d ~/.linuxbrew && eval $(~/.linuxbrew/bin/brew shellenv)
test -d /home/linuxbrew/.linuxbrew && eval $(/home/linuxbrew/.linuxbrew/bin/brew shellenv)
test -r ~/.bash_profile && echo "eval \$($(brew --prefix)/bin/brew shellenv)" >>~/.bash_profile
echo "eval \$($(brew --prefix)/bin/brew shellenv)" >>~/.profile
# brewコマンド使えるか確認
brew install hello
インストールに失敗するときは、yum updateしてみましょう。
aws-vaultコマンド使うときは、awsコマンドも使うことも多いので入っていなければインストールしましょう。
aws-cliはpipコマンドで導入することができます。pipコマンドが入っていなければ事前にインストールしておきます。
docs.aws.amazon.com
pipコマンドはpythonがインストールされていればありますが、おすすめはpyenvコマンドでpythonをインストールするようにしておくとバージョンを切り替えしやすいので良いと思います。
github.com
# pipコマンドでaws-cliコマンドをインストール
pip3 install awscli --upgrade --user
# コマンドが入っているか確認
aws --version
aws-cli/1.16.278 Python/3.6.3 Linux/3.10.0-957.10.1.el7.x86_64 botocore/1.13.14
インストールしたのにcommand not foundと表示される場合は、パスが通ってないと思うので下記コマンドを実行。
export PATH=~/.local/bin:$PATH
source ~/.bash_profile
3. aws-vaultのインストール
brewコマンドを使ってインストールします。
# aws-vaultのインストール
brew install aws-vault
インストールが終わったら、プロファイルに使うAWSのアクセスキー及びシークレットキーを登録します。
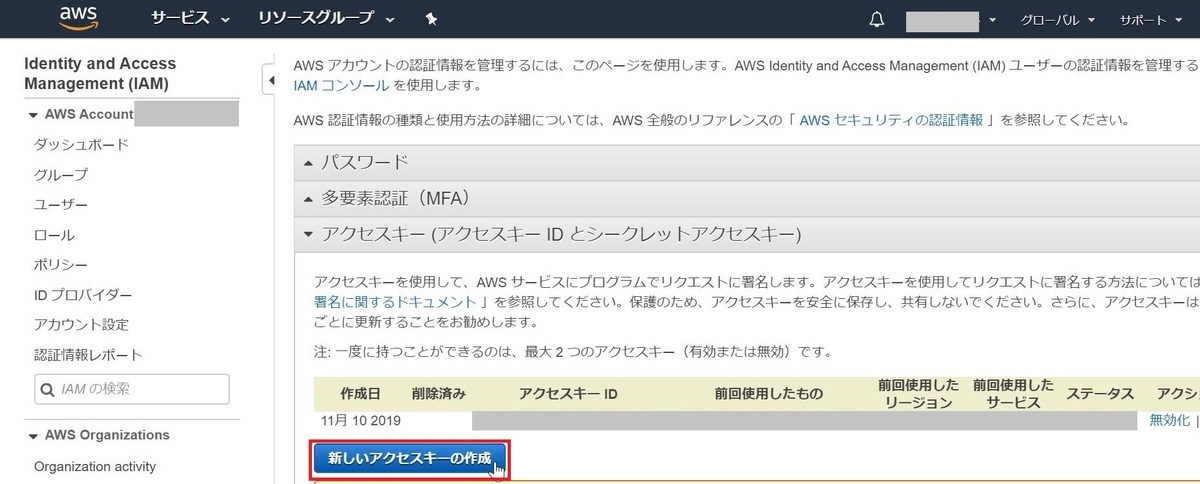
アクセスキー及びシークレットキーは、AWSのコンソールにログインし「マイセキュリティ資格情報」から「新しいアクセスキーの作成」をクリックして発行します。

# プロファイルを登録する
aws-vault add [profile-name]
Enter Access Key Id: ABDCDEFDASDASF
Enter Secret Key: %%%
# aws-vaultコマンドを実行するときのパスフレーズを設定
Enter passphrase to unlock /home/vagrant/.awsvault/keys/:
設定が完了したらプロファイルが登録されているか下記コマンドで確認し、awsのコンソールにログインできるか確認します。
# プロファイルが登録されているか確認
aws-vault ls
Profile                  Credentials              Sessions
=======                  ===========              ========
my-profile               my-profile               -
# ログイン確認
aws-vault login [profile_name]
github.com
コンソール画面がブラウザで開くか、発行されたURLにアクセスしてコンソール画面には入れればOK!
5. terraformを使ってみる
適当にterraform用のディレクトリを作成し、リソース定義用のファイルを作ります。
# ディレクトリ作成
mkdir terraform_test
cd terraform_test
# main.tfファイルを作成
vim main.tf
main.tfの中身はec2インスタンスを立てるための定義を書いていきます。使うAMI IDはEC2>イメージ>AMIからAMI IDを控えます。
main.tf
resource "aws_instance" "example" {
  ami = "ami-0xxxxxxxxxxxxxxxxxxx"
  instance_type = "t2.micro"
}
コードを書いたら、terraform initしてterraformを実行するのに必要なバイナリをダウンロードします。
$ aws-vault exec my-profile -- terraform init

Initializing the backend...

Initializing provider plugins...

The following providers do not have any version constraints in configuration,
so the latest version was installed.

To prevent automatic upgrades to new major versions that may contain breaking
changes, it is recommended to add version = "..." constraints to the
corresponding provider blocks in configuration, with the constraint strings
suggested below.

* provider.aws: version = "~> 2.35"

Terraform has been successfully initialized!

You may now begin working with Terraform. Try running "terraform plan" to see
any changes that are required for your infrastructure. All Terraform commands
should now work.

If you ever set or change modules or backend configuration for Terraform,
rerun this command to reinitialize your working directory. If you forget, other
commands will detect it and remind you to do so if necessary.
successしていたらOKです。
続いて、terraform planコマンドを実行してどんなリソースを追加する予定か実行計画を表示させます。
$ aws-vault exec my-profile -- terraform plan
Enter passphrase to unlock /home/vagrant/.awsvault/keys/:
Refreshing Terraform state in-memory prior to plan...
The refreshed state will be used to calculate this plan, but will not be
persisted to local or remote state storage.


------------------------------------------------------------------------

An execution plan has been generated and is shown below.
Resource actions are indicated with the following symbols:
  + create

Terraform will perform the following actions:

  # aws_instance.example will be created
  + resource "aws_instance" "example" {
      + ami                          = "ami-0axxxxxxxxxxxxxxxxx"
      + arn                          = (known after apply)
      + associate_public_ip_address  = (known after apply)
      + availability_zone            = (known after apply)
      + cpu_core_count               = (known after apply)
      + cpu_threads_per_core         = (known after apply)
      + get_password_data            = false
      + host_id                      = (known after apply)
      + id                           = (known after apply)
      + instance_state               = (known after apply)
      + instance_type                = "t2.micro"
      + ipv6_address_count           = (known after apply)
      + ipv6_addresses               = (known after apply)
      + key_name                     = (known after apply)
      + network_interface_id         = (known after apply)
      + password_data                = (known after apply)
      + placement_group              = (known after apply)
      + primary_network_interface_id = (known after apply)
      + private_dns                  = (known after apply)
      + private_ip                   = (known after apply)
      + public_dns                   = (known after apply)
      + public_ip                    = (known after apply)
      + security_groups              = (known after apply)
      + source_dest_check            = true
      + subnet_id                    = (known after apply)
      + tenancy                      = (known after apply)
      + volume_tags                  = (known after apply)
      + vpc_security_group_ids       = (known after apply)

      + ebs_block_device {
          + delete_on_termination = (known after apply)
          + device_name           = (known after apply)
          + encrypted             = (known after apply)
          + iops                  = (known after apply)
          + kms_key_id            = (known after apply)
          + snapshot_id           = (known after apply)
          + volume_id             = (known after apply)
          + volume_size           = (known after apply)
          + volume_type           = (known after apply)
        }

      + ephemeral_block_device {
          + device_name  = (known after apply)
          + no_device    = (known after apply)
          + virtual_name = (known after apply)
        }

      + network_interface {
          + delete_on_termination = (known after apply)
          + device_index          = (known after apply)
          + network_interface_id  = (known after apply)
        }

      + root_block_device {
          + delete_on_termination = (known after apply)
          + encrypted             = (known after apply)
          + iops                  = (known after apply)
          + kms_key_id            = (known after apply)
          + volume_id             = (known after apply)
          + volume_size           = (known after apply)
          + volume_type           = (known after apply)
        }
    }

Plan: 1 to add, 0 to change, 0 to destroy.

------------------------------------------------------------------------

Note: You didn't specify an "-out" parameter to save this plan, so Terraform
can't guarantee that exactly these actions will be performed if
"terraform apply" is subsequently run.
+ createがリソースを追加する処理を行うことを表していて、追加される部分には"+"が表示されています。特にエラーが表示されなければterraform applyコマンドを実行し、リソースを追加します。
$ aws-vault exec my-profile -- terraform apply
Enter passphrase to unlock /home/vagrant/.awsvault/keys/:

An execution plan has been generated and is shown below.
Resource actions are indicated with the following symbols:
  + create

Terraform will perform the following actions:

  # aws_instance.example will be created
  + resource "aws_instance" "example" {
      + ami                          = "ami-0axxxxxxxxxxxxxxxx"
      + arn                          = (known after apply)
      + associate_public_ip_address  = (known after apply)
      + availability_zone            = (known after apply)
      + cpu_core_count               = (known after apply)
      + cpu_threads_per_core         = (known after apply)
      + get_password_data            = false
      + host_id                      = (known after apply)
      + id                           = (known after apply)
      + instance_state               = (known after apply)
      + instance_type                = "t2.micro"
      + ipv6_address_count           = (known after apply)
      + ipv6_addresses               = (known after apply)
      + key_name                     = (known after apply)
      + network_interface_id         = (known after apply)
      + password_data                = (known after apply)
      + placement_group              = (known after apply)
      + primary_network_interface_id = (known after apply)
      + private_dns                  = (known after apply)
      + private_ip                   = (known after apply)
      + public_dns                   = (known after apply)
      + public_ip                    = (known after apply)
      + security_groups              = (known after apply)
      + source_dest_check            = true
      + subnet_id                    = (known after apply)
      + tenancy                      = (known after apply)
      + volume_tags                  = (known after apply)
      + vpc_security_group_ids       = (known after apply)

      + ebs_block_device {
          + delete_on_termination = (known after apply)
          + device_name           = (known after apply)
          + encrypted             = (known after apply)
          + iops                  = (known after apply)
          + kms_key_id            = (known after apply)
          + snapshot_id           = (known after apply)
          + volume_id             = (known after apply)
          + volume_size           = (known after apply)
          + volume_type           = (known after apply)
        }

      + ephemeral_block_device {
          + device_name  = (known after apply)
          + no_device    = (known after apply)
          + virtual_name = (known after apply)
        }

      + network_interface {
          + delete_on_termination = (known after apply)
          + device_index          = (known after apply)
          + network_interface_id  = (known after apply)
        }

      + root_block_device {
          + delete_on_termination = (known after apply)
          + encrypted             = (known after apply)
          + iops                  = (known after apply)
          + kms_key_id            = (known after apply)
          + volume_id             = (known after apply)
          + volume_size           = (known after apply)
          + volume_type           = (known after apply)
        }
    }

Plan: 1 to add, 0 to change, 0 to destroy.

Do you want to perform these actions?
  Terraform will perform the actions described above.
  Only 'yes' will be accepted to approve.

  Enter a value: yes

aws_instance.example: Creating...
aws_instance.example: Still creating... [10s elapsed]
aws_instance.example: Still creating... [21s elapsed]
aws_instance.example: Still creating... [35s elapsed]
aws_instance.example: Still creating... [45s elapsed]
aws_instance.example: Creation complete after 55s [id=i-00323c63887212062]

Apply complete! Resources: 1 added, 0 changed, 0 destroyed.
リソースを更新するときは、main.tfに定義を追加し再度terraform applyを実行すればOK。ただし、追加したものによってはリソースが置き換わる(元々あったものが削除され新しくリソースが作成される)こともあるので、terraform planで変更内容を確認してから実行すると良いです。
おわり。


